AI Video Editing Workflow: How Claude Edited a Reel Without a Timeline

The short answer: in our AI video editing workflow, Claude does every edit but never starts with the edit. You put your raw takes and script in one folder, Claude cuts them and builds a storyboard page with one row per frame, you approve each frame or leave a note, and only then does Claude render. Fixing a still frame costs seconds; fixing a finished video costs a full render.
Most people who try editing with AI hit the same wall. You ask for the video, wait for the render, spot five things you don't like and ask again. Every round redraws the whole reel, so you spend your time and your Claude usage on fixes you could have caught in a still frame.
We at Artea edited Riya's reel “Is video ka ek bhi second” this way. Fourteen raw takes went in, bad takes included, and a 48.7-second reel came out. Nobody opened CapCut, Premiere Pro or a timeline. This post walks through the whole AI video editing workflow we used, with the prompts, the review page and the mistakes we made on the way.
What you need
- Claude Code, the part of Claude that can work with files on your computer. It also runs as the Code tab in the Claude desktop app for Mac and Windows, which is how we use it.
- Your raw takes and the script, together in one folder. Retakes and bloopers are fine, because Claude picks the best take for every line.
- Three free tools Claude installs for you: FFmpeg cuts video and mixes sound, Whisper turns speech into text, and MediaPipe separates you from the background. If you haven't set them up yet, our talking head editing guide does it with one prompt.
Plan check: Claude Code is not on the free Claude plan. You need Pro, Max, Team or Enterprise. Pro is $20 a month billed monthly, or $17 a month billed yearly, as of November 2026. Plans change, so check claude.com/pricing before you sign up.
The AI video editing workflow, step by step
Step 1: Let Claude cut the raw takes
Point Claude at the folder. It writes out every take as text, matches each line of your script to its best take and cuts every pause longer than a fifth of a second. You don't touch the footage at this stage.
Why it works: Claude compares every take against your script, so it judges them by what you said rather than by where they sit in a folder.
Here is my script and my raw takes in this folder. Transcribe every take, pick the best take for each line and cut every pause. Don't edit anything else yet.
Step 2: Ask for the storyboard before the edit
This is the step most people skip. Instead of a video, ask Claude for a storyboard page: one row per frame, each with a still preview, the spoken line, what appears on screen, how it moves, which sound plays and which take it came from. At the top, Claude lists the decisions it needs from you first, such as the music, captions and length.
Why it works: you judge the whole reel while every frame is still a picture, so a wrong idea costs a quick redraw instead of a render.
Before you edit anything, make me a storyboard of this reel as a page: one row per frame with a preview, the line, the visual, the motion, the sound and the source take, plus the decisions you need from me before rendering.
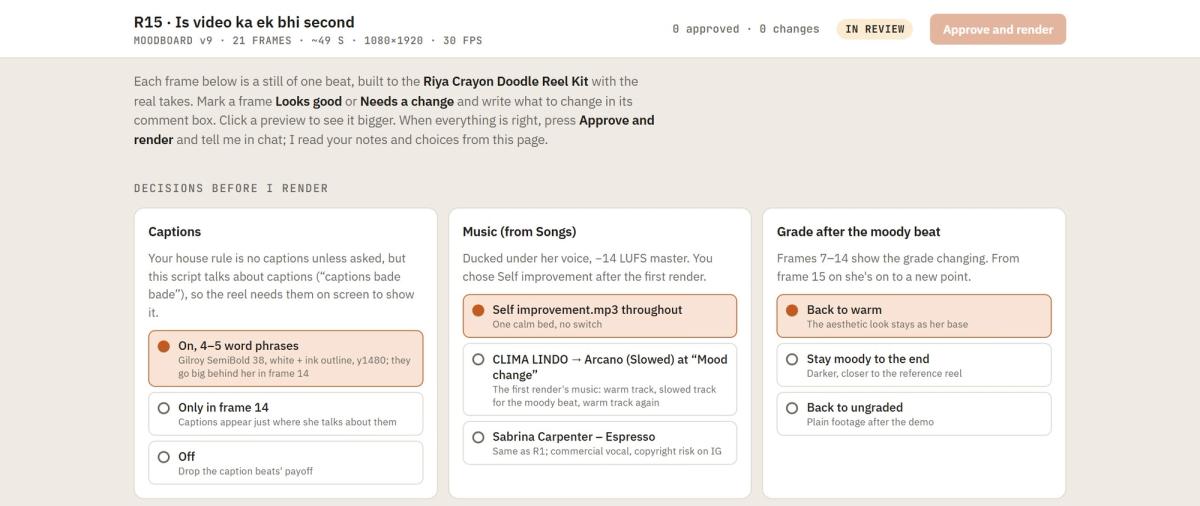
Two terms you'll see: a storyboard is the frame-by-frame plan of a video. Claude publishes it as an artifact, a private web page on claude.ai that only you can see until you share it.
Step 3: Leave notes on the frames
Go through the page frame by frame. Mark a frame Looks good, or press Needs a change and type what you want in plain words. Then tell Claude you've left notes: it reads them, fixes those frames, raises the version number and marks what changed, so you only re-check those rows.
Why it works: each note sits on the frame it's about, so nothing gets lost in a long chat. Our reel went through nine versions and 33 notes. One note asked for the colour to change exactly when Riya snaps her fingers, so Claude found the snap in the audio and moved the change to that frame.
I left my notes on the storyboard. Apply them and update it.
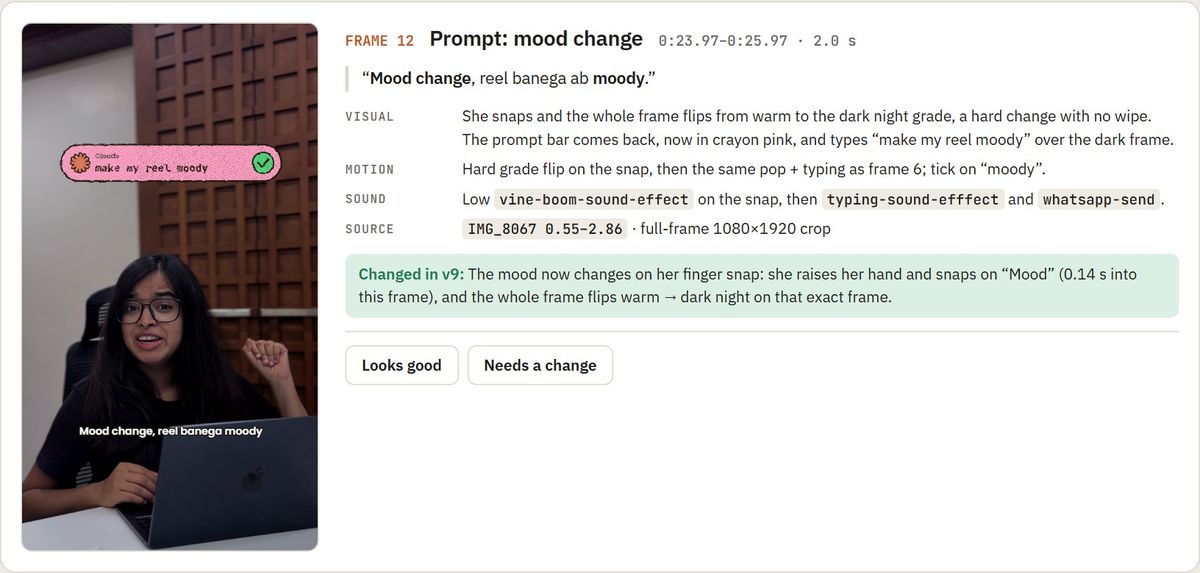
We saved this review page as a skill, a folder of instructions Claude follows every time, so every reel gets the same page without us explaining it again.
Step 4: Approve, then let Claude render
When every frame looks right, say so. Claude builds the video from the approved plan: it colours the footage, draws every graphic from the storyboard, cuts Riya out of the background where the big captions sit behind her, and mixes sound effects and music under her voice at -14 LUFS, a common loudness target for reels.
Why it works: the render follows the page you signed off, so the first render already looks like what you approved.
Approved. Render the video.
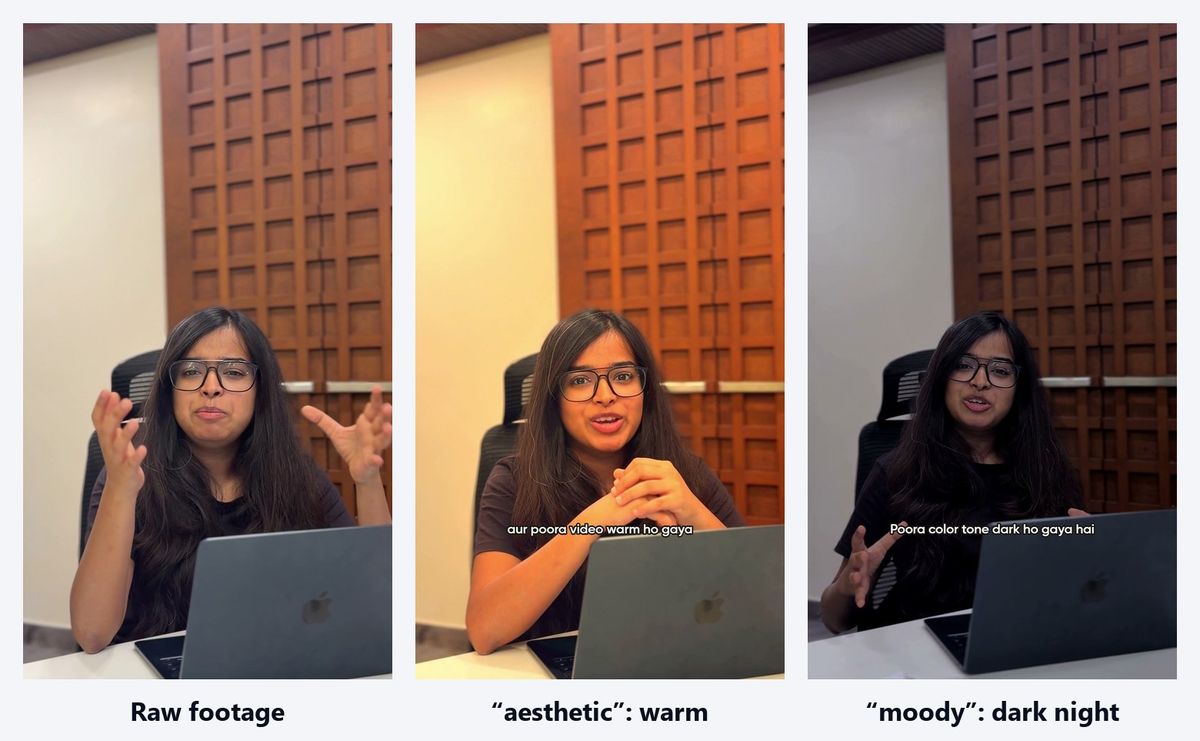
Here is what the two one-word style prompts in the reel, “aesthetic” and “moody”, did to the same footage.
Step 5: Review the render and fix it in plain words
Watch the render and tell Claude what feels off, the way you'd brief a human editor. If anything spoken changed, ask for the transcript first and check it before the next render.
Why it works: your fixes go into the same plan, so each new render keeps everything you already approved. After our first render we asked for faster motion, quieter sound effects and different music. Later rounds removed a frame, added a text hook and swapped the music twice. A music swap only re-mixes the sound, so it took about a minute.
The motion is slow, make it faster. The sound effects are too loud. Change the music. Show me the transcript first, and render only after I approve it.
Why the storyboard saves tokens
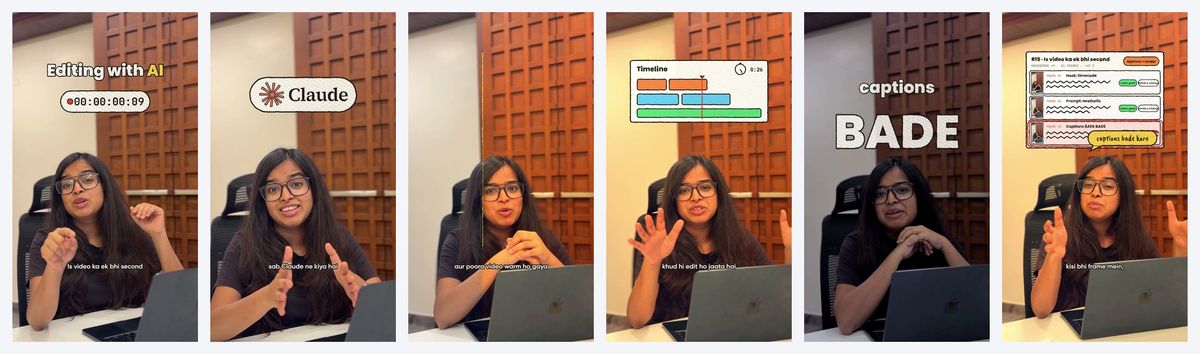
Tokens are the units Claude's usage is measured in: the more Claude reads, writes and runs, the more you use. A storyboard change redraws one still. A render change redraws every frame of the reel, which for our 48.7 seconds is 1,460 frames, and then rebuilds the sound.
That's why Riya says the storyboard saves her tokens. Most of our changes happened across nine storyboard versions, and the reel needed only a handful of renders.
Common mistakes when editing video with AI in 2026
- Asking for the finished video in the first prompt. You end up reviewing renders instead of a plan, and every fix costs a full render.
- Putting all your feedback in one long chat message. Notes on the frame they belong to are easier for Claude to apply and easier for you to check.
- Approving frames from the small preview alone. Open the bigger preview and read the motion and sound lines, because that's where timing problems hide.
- Skipping the transcript check. Whisper can mishear Hinglish and brand names, and captions are drawn from its text.
- Using songs or other creators' clips without checking the rights. Commercial music and other people's reels can get your reel muted or flagged on Instagram.
FAQ
Can Claude edit a video without CapCut or Premiere Pro?
Yes. Claude cuts the takes, colours the footage, draws the graphics and mixes the sound with free tools it runs on your computer. You never open an editing app or a timeline; you review a storyboard page and the finished video.
Do I need to know coding to edit videos with Claude?
No. You talk to Claude in plain words, and it writes and runs any code itself. You'll be asked to approve some steps, such as installing a tool, but you don't write anything.
Which Claude plan do I need to edit videos with Claude?
Any plan that includes Claude Code: Pro, Max, Team or Enterprise. The free plan doesn't include it, so you can't run this workflow there.
How long does it take Claude to edit a reel?
Once the storyboard was approved, a full render of our 48.7-second reel took about 15 minutes on a regular laptop. Most of the time goes into review rounds, which is the point: you spend it on still frames, not on renders.
Can I change the music after the video is rendered?
Yes. Tell Claude which song to use and it re-mixes only the sound, which takes about a minute. The picture stays exactly as you approved it.
Want Riya's full workflow and framework? Share the reel to her Instagram DMs and she'll send it to you.
In short: don't ask Claude for a finished video first. Let it cut your raw takes, ask for a storyboard page, leave notes on the frames until every one looks right, then approve the render and fix what's left in plain words. Changes are cheap while the reel is still a set of stills, and that's what keeps the edit fast and your token use low.
Quick summary · key points
- ✓What you need
- ✓The AI video editing workflow, step by step
- ✓Step 1: Let Claude cut the raw takes
- ✓Step 2: Ask for the storyboard before the edit
- ✓Step 3: Leave notes on the frames
- ✓Step 4: Approve, then let Claude render